[TUTOR] Organizing Your Inventory
November 12, 2008 at 4:48 pm | Posted in » Tutorials | 2 CommentsTags: blackie's tutorblog, Box, Clean, Folder, Inventory, item, Lag, Less, Organizing, Second Life, SecondLife, SL, Spotless, Storage, Storaging, Suggested, Tutor, Tutorial, unpack
Argh, that inventory is just clogged, it makes me SO frustrated when I open it.
But don’t worry – there is a simple, fun and clean way to fix this mess! And to make your inventory spotless-sparkly-clean…
Just like in real life, we sometimes store our junk in boxes for future review, and that also works for SL. I’ll show you how:
We shall start with storing unused junk that you have in a box. Why box? Because they are as one object in your Inventory, and in that object you can store TONS of unused junk for later review. More items in your Inventory cause more lag!
Go into Build mode and create a cube box (Note: this can be any other shaped prim, though I will use the box for this demonstration).


In the Build window, go to the Content tab. This is normally where you put scripts, items for sale, and now for storage!

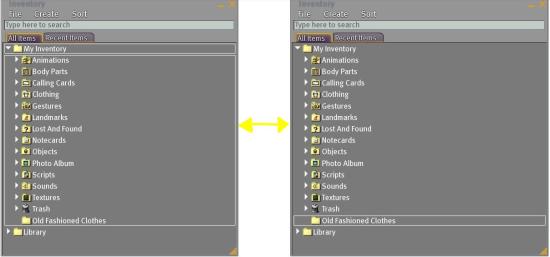
Open your Inventory (bottom of screen) and create a folder by going to Create menu > New Folder.


This will create a brand new folder in your Inventory named “New Folder“. We need to rename the folder so we could recognize it afterward. So right click on the New Folder and choose Rename. For my demonstration I will use it for clothes, so I will name it a formal name: Old Fashioned Clothes. The name of the folder is only important for now so we could drag the items we wish into it.

Now we will open a new Inventory window so we could organize it in an easier way; go to the File menu and choose New Window.

A new Inventory window just popped, duplication of the already opened one.

Now we can search for our items and drag them to the folder. Tip: hold down the CTRL (Control) key and select all the items and drag.

After you’re done moving everything to the new folder, drag the folder onto the object’s Content tab.


Tada! The items are now stored in the object. Rename the object how you named the folder, so when you unpack it will have the same name.
So go to the General tab in Edit window and under “Name:” write the desired folder name. I will name it like the folder before: “Old Fashioned Clothes“.

You can also give a description to your storage object, for example: “These are very old fashioned clothes from 2007“. But this is optional ;)
Of course, we want the afterward experience of unpacking to be more pleasant and easy, so while still in General tab > When Left-Clicked, choose from the drop down “Open” option. This will enable so when you just click the object it will open the contents of the object and copy them to your Inventory when you want and necessary. But you can also use the other way, by using a script that automatically sends you a copy when you click the object, a tutorial on that can be found Here.

Your storage items can be found under the Objects folder within your Inventory.

After you have created simular storage boxes like the one we just made we can create a folder for them all to put them in.
Like previously we used a folder to collect all the items to put in the storage box, we do the same here: File menu > Create > New Folder.
Name the new folder “Storage Boxes“, or something else – as you wish, so we could recognize it. Drag in the storage boxes and you’re done for storing unused items!

Now for USED items but always clogging your Inventory… you can use the Folder power that we learned now: I like creating folders for everything in my Inventory, it has a “cleaner” look, I assume. But this is entirely up to you.
Here are my suggested folders to have:
* My Creations = For your own artwork, prim-work, texture-work and creations (if any).
* Avatars = For your avatar collection (if any). For example: furries, robots, dragons, etc’.
* Pants/T-Shirts/Jackets/Socks/Swimwear/Pyjamas/Casual/Formal = A folder for each one of those under the Clothing folder to make your Inventory more closet friendly.
* Eyes/Skins/Bodies/Hair = A folder for each one in your official Body Parts folder.
* Accessories = Most likely you have accessories, like hats, jewelry, etc’. This is always good to have a folder for.
* Landscape/Houses/Garden = A folder for each one of these. I normally store these under the official Objects folder. In there you can put Plants/Furniture/etc’.
* HUD & Scripted = I know I have a LOT of scripted objects and a lot of HUD’s, it’s always good to have them stored in a clean way for fast attaching. Also this is good for scripted toys that you might have.
Blog at WordPress.com.
Entries and comments feeds.


